Back in March, I wrote Profiling WSGI Apps, describing one way to profile the placement service. It was useful enough that a version of it was added to the docs.
Since then I've wanted something a bit more flexible. I maintain a container for placement on Docker hub. When I want to profile recent master instead of code in a proposed branch, using a container can be tidier. Since this might be useful to others I thought I better write it down.
Get and Confirm the Image
Make sure you are on a host with docker and then get the latest
version of placedock:
docker pull cdent/placedock
We can confirm the container is going to work with a quick run:
docker run -it --env OS_PLACEMENT_DATABASE__SYNC_ON_STARTUP=True \
               --env OS_API__AUTH_STRATEGY=noauth2 \
               -p 127.0.0.1:8080:80 \
               --rm --name placement cdent/placedock
In another terminal check it is working:
curl -s http://127.0.0.1:8080/ |json_pp
should result in something similar to:
{
   "versions" : [
      {
         "min_version" : "1.0",
         "links" : [
            {
               "href" : "",
               "rel" : "self"
            }
         ],
         "status" : "CURRENT",
         "max_version" : "1.36",
         "id" : "v1.0"
      }
   ]
}
ctrl-c in the terminal that is running the container. We don't
want to use that one because we need one that will persist data
properly.
Dockerenv for Convenience
To enable persistence, a dockerenv file will be used to establish
configuration settings. The one I use, with comments:
# Turn on debug logging
OS_DEFAULT__DEBUG=True
# Don't use keystone for authentiation, instead pass
# 'x-auth-token: admin' headers
OS_API__AUTH_STRATEGY=noauth2
# Make sure the database has the right tables on startup
OS_PLACEMENT_DATABASE__SYNC_ON_STARTUP=True
# Connection to a remote database. The correct database URI depends on
# your environment.
OS_PLACEMENT_DATABASE__CONNECTION=postgresql+psycopg2://cdent@192.168.1.76/placement?client_encoding=utf8
# The directory where profile output should go. Leave this commented until
# sufficient data is present for a reasonable test.
# OS_WSGI_PROFILER=/profiler
Create your own dockerenv file, set the database URI accordingly
(if you're not sure about what this might be, Quick Placement
Development
may be useful), and start the container back up. This time we will
use the dockerenv file and put the container in the background:
docker run -idt -p 127.0.0.1:8080:80 \
       --env-file dockerenv \
       --rm --name placement \
       -v /tmp/profiler:/profiler \
       cdent/placedock
We've added a volume so that, eventually, profiler output can be saved to the disk of your container host, rather than the container itself. For the time being profiling is turned off because we don't want to slow down the system while adding data to the system.
If you want to, confirm things are working again with:
curl -s http://127.0.0.1:8080/ |json_pp
Load Some Data
In some cases you don't need pre-existing data when profiling. If that's the case, you can skip this step. What you need to use to set up data may be very different from what I'm doing here.
Loading up the service with a bunch of data can be accomplished in various ways. I use a combination of shell scripts and gabbi. The shell script is responsible for the dynamic data while gabbi is responsible the static structure. Some pending changes use the same system for doing some performance testing for placement. We will borrow that system. To speed things up a bit we'll use parallel.
seq 1 100 | \
   parallel "./gate/perfload-nested-loader.sh http://127.0.0.1:8080 gate/gabbits/nested-perfload.yaml"
Note: This will not work on a mac if you are using the built in
uuidgen. You may need a pipe totr [A-Z] [a-z].
You can see how many providers you've created with a request like:
curl -s -H 'x-auth-token: admin' \
     -H 'openstack-api-version: placement latest' \
     http://127.0.0.1:8080/resource_providers | \
     json_pp| grep -c '"name"'
Once you have a sufficient number of resource providers and anything else you might like (such as allocations) in the system, you can start profiling.
Profiling
When we were loading data we had profiling turned off. Now we'd like
to turn it on. Edit the dockerenv file to uncomment the
OS_WSGI_PROFILER line and then docker kill placement and run the
container again (using the same args as above). A restart will not
work because we've change the environment.
Make a query, such as:
curl http://127.0.0.1:8080/
and look in /tmp/profiler for the profile output, the filename
should looking something like this:
GET.root.19ms.1564579909.prof
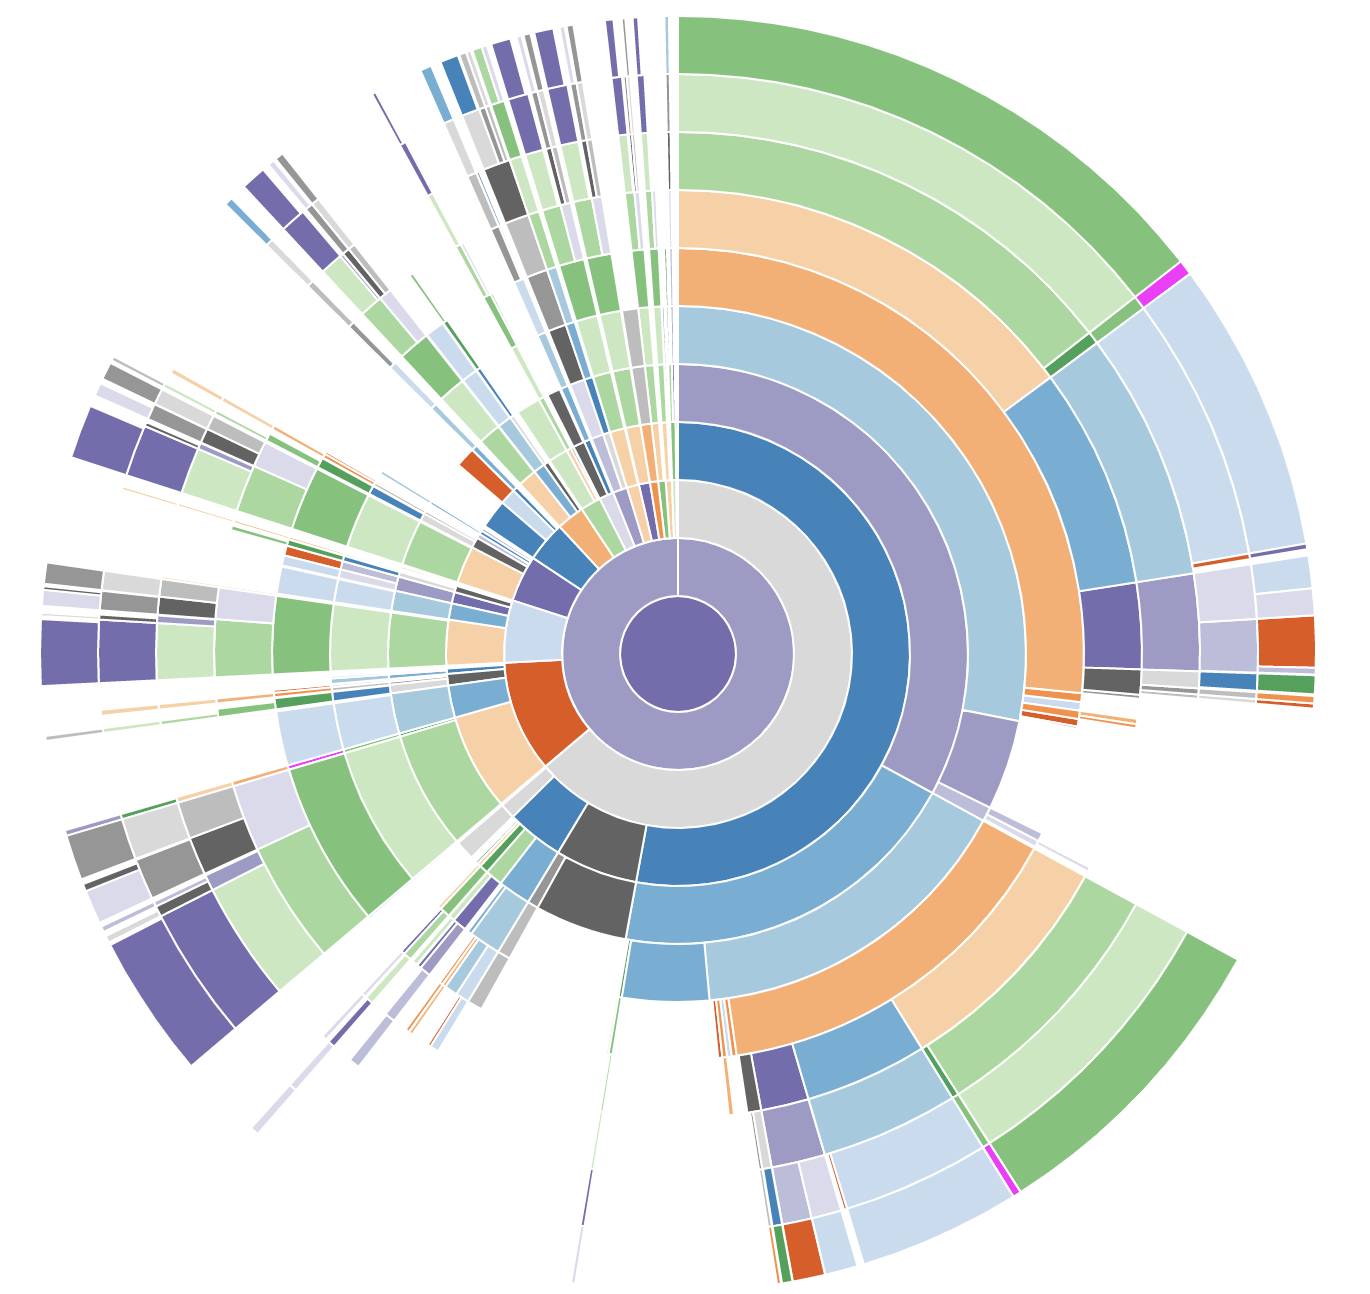
If you have snakeviz installed you can inspect the profiling info from a browser (as described in the previous blog post:
snakeviz GET.root.19ms.1564579909.prof
That's not a very interesting request. It doesn't exercise much of the code nor access the database. If the system has been loaded with data as above, the following will query it:
curl -H 'x-auth-token: admin' \
     -H 'openstack-api-version: placement latest' \
"http://127.0.0.1:8080/allocation_candidates?\
resources=DISK_GB:10&\
required=COMPUTE_VOLUME_MULTI_ATTACH&\
resources_COMPUTE=VCPU:1,MEMORY_MB:256&\
required_COMPUTE=CUSTOM_FOO&\
resources_FPGA=FPGA:1&\
group_policy=none&\
same_subtree=_COMPUTE,_FPGA"
and then:
snakeviz GET.allocation_candidates.792ms.1564581384.prof